opencv-python review
opencv-python 5.0.0.93 is the desktop wheel that exposes OpenCV 5.0.0 through Python's `cv2` import. It ships compiled CPU code for image decoding, color conversion, resizing, filtering, geometry, feature work, video capture, drawing, classical vision, and DNN inference over NumPy arrays. This wheel includes GUI-linked components and excludes CUDA plus some contrib or non-free algorithms. The `.93` suffix is the wheel-project revision. The release moves the bindings onto the OpenCV 5 major line and points 4.x users to an upstream migration guide.
opencv-python 5.0.0.93 installed in 1.1 seconds and consumed 245 MB, but `import cv2` failed in our sandbox because `libGL.so.1` was absent despite 0 audit findings. Use the headless wheel on servers; keep this desktop package for deployments that truly need OpenCV's GUI-linked build.
We installed it
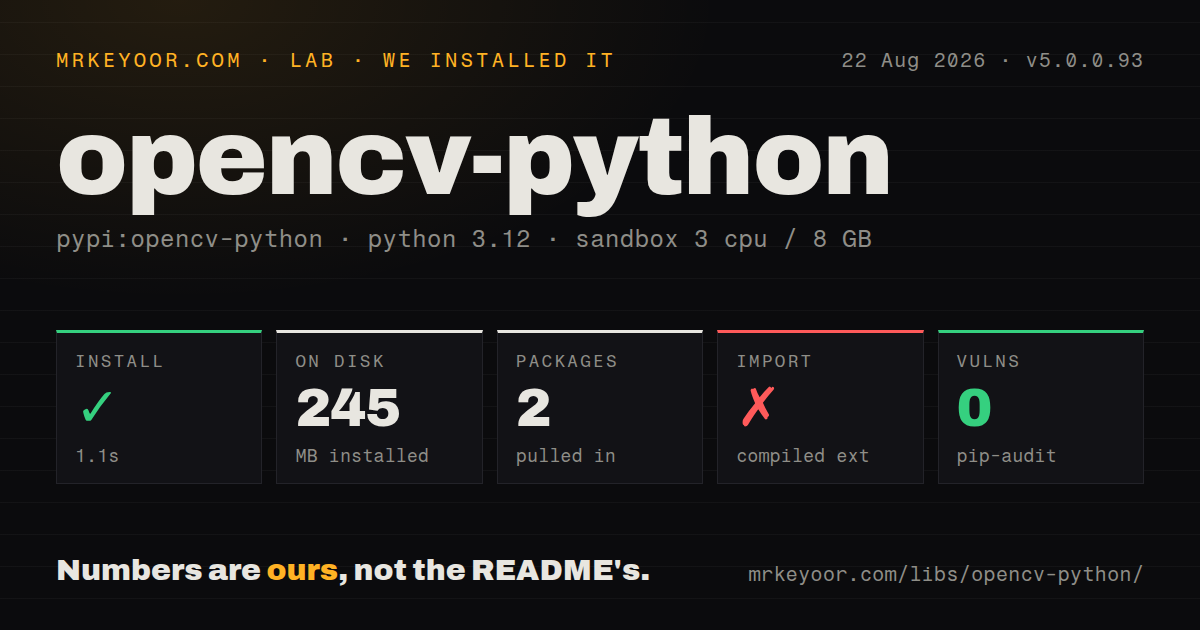
| Install | ✓ · 1.1s | 2 packages on disk · 245 MB |
| Import | ✗ | import cv2 · compiled extensions · py.typed · requires Python >=3.6 |
| Known vulns | 0 | (pip-audit) |
Answers from our run
Does opencv-python install cleanly?
Yes. In a fresh container with an empty cache, pip install opencv-python finished in 1 seconds, leaving 2 packages and 245 MB on disk. pip-audit reported no known vulnerabilities.
What does opencv-python need to run?
Python >=3.6, and a platform wheel with compiled extensions. In our run import cv2 failed, so it needs extra system packages, and the package ships py.typed for type checkers.
opencv-python or pillow: which should you use?
pillow: Use it for ordinary image I/O, resizing, cropping, conversion, and saving. opencv-python 5.0.0.93 installed in 1.1 seconds and consumed 245 MB, but import cv2 failed in our sandbox because libGL.so.1 was absent despite 0 audit findings.
When should you not use opencv-python?
The target is Docker, CI, a cloud worker, or another display-free Linux host. Our desktop-wheel import failed because libGL.so.1 was missing; the headless wheel is designed for that environment.
Use it if
- A desktop Python program needs OpenCV image, video, camera, calibration, geometry, or classical-vision APIs together with native display windows.
- NumPy-based image or video preprocessing needs compiled operators before data enters another inference library.
- You want the prebuilt CPU bindings for OpenCV 5 and do not need CUDA or algorithms omitted from the main wheel.
- Local `VideoCapture`, `imshow`, and keyboard event handling are real requirements on a machine with the matching GUI libraries.
- The target is Docker, CI, a cloud worker, or another display-free Linux host. Our desktop-wheel import failed because `libGL.so.1` was missing; the headless wheel is designed for that environment.
- CUDA execution is required. The wheel README calls all four published variants CPU-only and directs GPU users to a custom OpenCV build.
- The job is limited to ordinary image loading, resizing, cropping, format conversion, and saving. Pillow has a smaller API and avoids OpenCV's BGR convention and GUI linkage.
- Any other OpenCV wheel variant is installed. Main, contrib, headless, and contrib-headless packages all write the same `cv2` namespace and must not coexist.
- A contrib or non-free algorithm is mandatory. The main wheel omits contrib modules, and the README says patented or non-free algorithms such as SURF cannot be distributed in these binaries.
- A service cannot absorb a 245 MB environment for a few image primitives. A narrower imaging package is easier to deploy and audit.
Setup reality
We installed opencv-python 5.0.0.93 in a fresh unprivileged Python 3.12 Bookworm container. pip finished in 1.1 seconds and left 2 packages occupying 245 MB. The distribution declares 2 direct dependencies, requires Python 3.6 or newer, includes compiled .so files and py.typed, and reports Apache 2.0. pip-audit found 0 known vulnerabilities.
The import check then failed with ImportError: libGL.so.1: cannot open shared object file: No such file or directory. This is the desktop wheel, which links GUI support. Use opencv-python-headless when native windows are unnecessary. Install exactly one of the 4 wheel variants because each owns cv2. Remove old manually copied cv2.so or cv2.pyd files before installing a wheel.
OpenCV needs no credentials or config file, but cameras and codecs depend on the host. VideoCapture can select FFmpeg, GStreamer, V4L2, AVFoundation, or Windows backends, with different device and codec results. Test the exact deployment image and media files. On Windows, a missing Visual C++ runtime, Universal C Runtime, or Media Foundation component can also stop imports or video support.
Color images load as BGR, while Pillow, Matplotlib, and many model inputs expect RGB. imread often returns None for a bad path or decoder failure, and VideoCapture.read() returns a success flag that must be checked. Writers need a supported codec and fixed frame dimensions. Version 5.0.0.93 packages the OpenCV 5 major line, so run 4.x applications against the linked 4-to-5 migration guide before upgrading.
Patterns
Reject an image decode failure read-image
import cv2

image = cv2.imread('input.jpg', cv2.IMREAD_COLOR)
if image is None:
    raise ValueError('input.jpg could not be decoded')
`imread` commonly returns `None` for a wrong path, unsupported file, or decoder error. It does not reliably raise an exception.
Convert BGR pixels for an RGB consumer convert-bgr-rgb
rgb = cv2.cvtColor(image, cv2.COLOR_BGR2RGB)
# pass rgb to Pillow, Matplotlib, or an RGB model
OpenCV's default color order is BGR. Sending that array directly to RGB code exchanges the red and blue channels.
Choose interpolation for resize direction resize-image
height, width = image.shape[:2]
small = cv2.resize(
    image,
    (width // 2, height // 2),
    interpolation=cv2.INTER_AREA,
)
large = cv2.resize(
    image,
    None,
    fx=2,
    fy=2,
    interpolation=cv2.INTER_CUBIC,
)
The explicit size tuple is `(width, height)`, which reverses the first 2 entries returned by NumPy `shape`.
Verify image encoding write-image
ok = cv2.imwrite(
    'output.webp',
    image,
    [cv2.IMWRITE_WEBP_QUALITY, 85],
)
if not ok:
    raise OSError('OpenCV could not write output.webp')
`imwrite` returns a boolean. A known file extension does not prove that the current build has a working encoder.
Read and release a camera capture-camera
capture = cv2.VideoCapture(0)
try:
    if not capture.isOpened():
        raise RuntimeError('camera did not open')
    while True:
        ok, frame = capture.read()
        if not ok:
            break
        process(frame)
finally:
    capture.release()
Device numbers and capture backends differ by host. Check both `isOpened()` and each `read()` result on the actual camera machine.
Show a frame in a desktop process display-frame
cv2.imshow('preview', image)
key = cv2.waitKey(1) & 0xFF
if key == ord('q'):
    cv2.destroyAllWindows()
`imshow` needs a GUI wheel and compatible host display libraries. It is absent from headless variants and unsuitable for most server containers.
Write frames with fixed dimensions write-video
height, width = frames[0].shape[:2]
writer = cv2.VideoWriter(
    'result.mp4',
    cv2.VideoWriter_fourcc(*'mp4v'),
    30.0,
    (width, height),
)
try:
    for frame in frames:
        if frame.shape[:2] != (height, width):
            raise ValueError('frame size changed')
        writer.write(frame)
finally:
    writer.release()
Codec support depends on the wheel and host. A codec or frame-size mismatch can leave an empty or unreadable output file.
Threshold a page with uneven lighting threshold-document
gray = cv2.cvtColor(image, cv2.COLOR_BGR2GRAY)
binary = cv2.adaptiveThreshold(
    gray,
    255,
    cv2.ADAPTIVE_THRESH_GAUSSIAN_C,
    cv2.THRESH_BINARY,
    21,
    7,
)
Adaptive threshold block size must be odd and greater than 1. Tune it to the physical scale of the lighting variation.
Blur before Canny detection detect-edges
gray = cv2.cvtColor(image, cv2.COLOR_BGR2GRAY)
blurred = cv2.GaussianBlur(gray, (5, 5), 0)
edges = cv2.Canny(blurred, 80, 160)
Canny's 2 thresholds depend on image contrast and noise. Validate a fixed pair across the real document or camera set.
Measure external foreground contours find-contours
contours, hierarchy = cv2.findContours(
    binary,
    cv2.RETR_EXTERNAL,
    cv2.CHAIN_APPROX_SIMPLE,
)
boxes = [
    cv2.boundingRect(contour)
    for contour in contours
    if cv2.contourArea(contour) >= 500
]
`findContours` treats white pixels as foreground. Reversing threshold polarity changes which shapes are found.
Annotate without changing source pixels draw-detection
annotated = image.copy()
cv2.rectangle(
    annotated,
    (x1, y1),
    (x2, y2),
    (0, 255, 0),
    2,
)
cv2.putText(
    annotated,
    label,
    (x1, y1 - 8),
    cv2.FONT_HERSHEY_SIMPLEX,
    0.6,
    (0, 255, 0),
    2,
)
OpenCV drawing calls mutate the supplied array. Copy first when later processing needs the original pixels.
Load a cascade shipped in the wheel load-haar-cascade
cascade_path = (
    cv2.data.haarcascades
    + 'haarcascade_frontalface_default.xml'
)
detector = cv2.CascadeClassifier(cascade_path)
if detector.empty():
    raise RuntimeError('cascade did not load')
faces = detector.detectMultiScale(
    gray,
    scaleFactor=1.1,
    minNeighbors=5,
)
The XML file ships with the wheel, but Haar cascades produce more false positives than current learned detectors. Test the detector against your data.
Alternatives
| Package | Registry | Pick it when |
|---|---|---|
| pillow | PyPI | Use it for ordinary image I/O, resizing, cropping, conversion, and saving. |
| scikit-image | PyPI | Use it for image-processing algorithms presented through NumPy and SciPy conventions. |
| opencv-python-headless | PyPI | Use the core `cv2` API in containers and servers that never open native windows. |
More ai / ml guides
openai · mcp · huggingface-hub · @modelcontextprotocol/sdk · scikit-learn · tiktoken · the whole shelf →
How this guide is made: grounded in the library's documentation, release notes, changelog, and issue history, on a fixed rubric — not a hands-on install of every release. The 50 most-downloaded entries are additionally install-verified in clean containers. Corrections: contact the desk.