
Short answer: use it to study water rendering
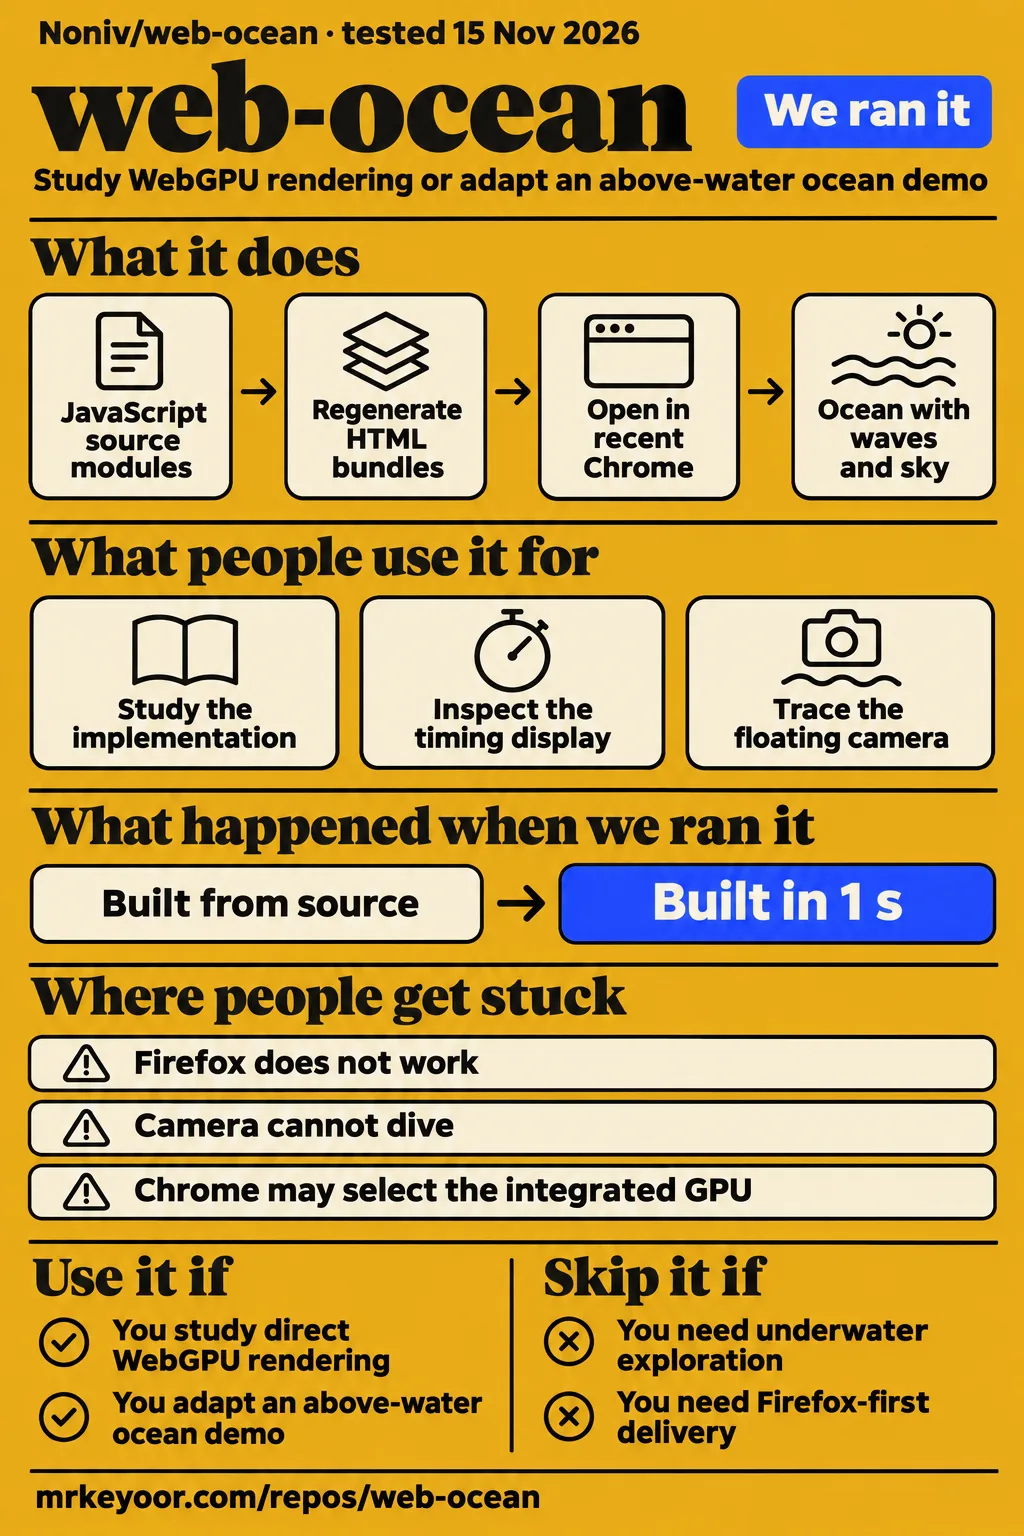
Use Noniv/web-ocean to study direct WebGPU ocean rendering or adapt an above-water demo; choose another starting point for underwater exploration or shoreline interactions. The project packages its scene into self-contained HTML files and keeps the implementation in JavaScript modules containing WGSL shaders. That combination gives a graphics developer two useful entry points: open the delivered page, or follow the code that constructs its waves, sky and post-processing.
Noniv/web-ocean uses WebGPU without an engine or rendering library. The project README describes a sunset sea with simulated waves, whitecaps and sun glitter. This review focuses on whether that implementation fits a developer's brief. The useful distinction is between studying an open-ocean renderer and starting a scene that already includes interactions with land, boats or an underwater camera. The alternatives below help make that choice using their documented features.
What people use web-ocean for
The project author built the renderer with Claude Code and measured GPU timing; the reporter of issue #3 tried to dive below its surface. These three activities give a developer concrete routes into the project: study the implementation process, inspect the timing display, or trace the camera's relationship to the waves. The linked accounts connect each activity to the person who described it.
- The project author built a WebGPU ocean renderer with AI assistance. In the author's development account, the author says, "I built this with Claude Code (Opus 5.5)." The account describes requesting realistic water with a floating camera and leaving architecture and implementation to Claude Code. That makes the repository relevant to readers studying how an AI-assisted graphics implementation was organized.
- The project author measured rendering performance at 2560 by 1440. The author's performance account reports about 6 to 8 milliseconds of GPU time per frame on an RTX 5070 Ti while other programs also used the GPU. A developer examining performance can connect that reported observation to the README's description of the HUD and its timestamp-query support.
- The reporter of issue #3 tried to move below the ocean surface. The user's diving report says the user immediately wanted to dive but encountered a boundary. This is a concrete exploration attempt, and it gives a developer a reason to inspect the floating-camera behavior before choosing the renderer as the starting point for an underwater scene.
For a graphics developer, these accounts suggest specific reading tasks. Follow the cloud implementation alongside the author's explanation of its revisions, inspect how the HUD exposes timing, or trace how the camera follows displaced water. They also help define a project brief before development begins: a view across an ocean asks for a different starting implementation than an underwater scene.
What happened when we ran it
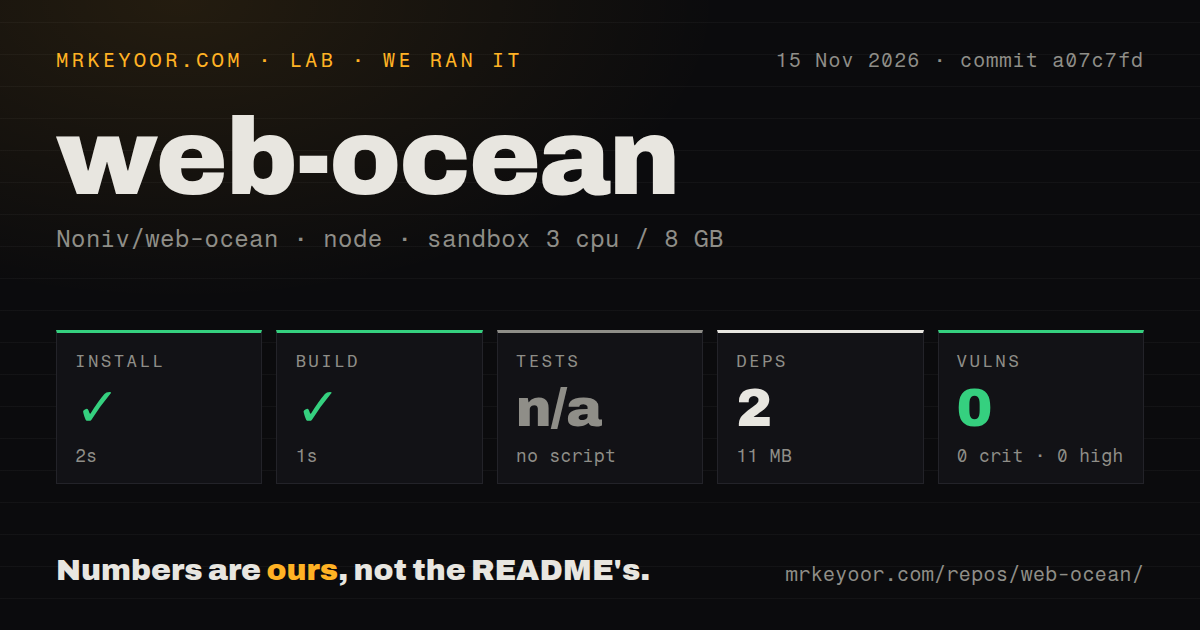
Our run installed commit a07c7fd in 2 seconds and built it in 1 second on 2026-11-15. The source sandbox recorded 2 dependencies occupying 11 MB, and npm audit reported 0 known vulnerabilities. These are our measurements from the supplied build harness. The table preserves its successful checks, skipped tests and repository signals, with each result tied to the question that the check answers.
| Question | Answer | Verdict | Why |
|---|---|---|---|
| Did installation complete? | Succeeded in 2 seconds | Passed | The install check recorded success |
| How much dependency material was recorded? | 2 dependencies, 11 MB on disk | Recorded | These are the harness dependency measurements |
| Did the build complete? | Succeeded in 1 second | Passed | The build check recorded success |
| Did tests run? | No tests script or target; skipped | Skipped | The harness found no test command or target |
| What did npm audit report? | 0 known vulnerabilities: 0 critical, 0 high, 0 moderate and 0 low | Recorded | This is the dependency audit result |
| How large was the checkout? | 19 files, about 2,542 source lines, 0.9 MB | Recorded | These are checkout measurements |
| What automation and container signals appeared? | 0 CI workflow files, no Dockerfile, no tests directory | Recorded | These are the harness scan results |
The configured source sandbox had 3 CPUs, 8 GB RAM and image label lab-node:22. Installation and compilation were short operations in that environment. The skipped test entry is also a finding worth preserving: the harness completed its source checks without a passing-test count. A developer deciding how to modify the renderer can use that information when planning checks around shader changes and generated bundles.
The separate hands-on run header says deployment used the project's own Docker Compose, with every port bound to 127.0.0.1. Its safety step instead records failure because compose.yaml, compose.yml, docker-compose.yaml and docker-compose.yml were absent, while the lab required a Compose file. The step contradicts the header's deployment wording. The teardown record records teardown: ok.
The failed step identifies the lab route that stopped: a Compose-based deployment attempt. Upstream's documented entry points are a self-contained HTML file and a static development server. Anyone repeating the evaluation should start from the README's viewing instructions rather than assume the repository supplies the container configuration demanded by that lab procedure. The source build and the failed safety step therefore lead to different, concrete next actions.
Where people get stuck
The sampled tracker contains a Firefox failure report, an underwater-camera request and a request for the generation prompt. The README also provides a laptop GPU-selection instruction, while the author describes a cloud-edge aliasing fix. These records concern browser troubleshooting, scene design, development reproducibility and a reported visual correction. Treating them separately makes the next action clearer.
| Report or symptom | What the evidence says | Practical response |
|---|---|---|
| Firefox does not work | Issue #2 reports failure; a commenter says it needs a fix | Begin with the README's recent-Chrome route |
| Camera cannot dive | Issue #3 reports a boundary; the README describes the above-water camera | Choose a starting implementation suited to an underwater brief |
| Laptop selects integrated graphics | The README warns about GPU selection | Follow its Windows graphics-settings instruction for Chrome |
| Reader wants the original prompt | Issue #4 requests PROMPT.md | Read the author's process account alongside the request |
| Cloud-edge aliasing | The author reports fixing it after replacing volumetric clouds | Follow the reported correction into the cloud implementation |
Issue #2, Does not work on Firefox, contains the report and the acknowledgement, "Yes, this needs a fix". The environment instruction comes from the README: recent Chrome with WebGPU and a reasonably capable GPU. For laptop users, the README specifically recommends selecting the dedicated GPU for Chrome through Windows graphics settings. That instruction gives a reader a direct setup action before inspecting the rendering code.
Issue #3, Unable to dive, connects the floating camera to a user's desired interaction. Issue #4, Requesting the prompt, asks for a PROMPT.md file containing the prompt used to generate the code. The README supplies the author's development narrative, including feedback that led to replacing volumetric clouds with flat layers and later fixing their edge aliasing.
How to open the bundle and change the source
The README documents ocean.html and ocean.min.html as self-contained pages that work from a file URL, with sizes of 102 KB and 61 KB respectively. For a first look, its instruction is to open either file directly in recent Chrome. For source development, it gives npm commands and a local server address. The two routes serve different tasks: viewing the delivered scene and editing its implementation.
Run npm install and then npm start to use the documented source route at http://localhost:8080/. After editing files under js/, run npm run build to regenerate both HTML bundles. The generated file you open should contain the source you intended to inspect. The README says the minified build removes WGSL comments and whitespace and minifies JavaScript with esbuild.
The controls combine mouse look with WASD movement. Clicking the canvas captures the mouse, Escape releases it, and H opens settings for the water and sky. The README also documents resolution, camera and field-of-view URL parameters. For a future comparison of shader changes, recording the URL alongside the commit would preserve the chosen viewpoint and settings, giving the resulting images or timings a useful reference.
What the performance number measures
The author reports about 6 to 8 milliseconds of GPU time per frame at 2560 by 1440 on an RTX 5070 Ti, while other programs also used the GPU. The README performance passage supplies the hardware, resolution, measured quantity and competing workload together. Those conditions belong with the number whenever it is quoted because they describe the author's observation.
The README says the HUD shows FPS and GPU time when the browser supports timestamp-query. That gives a developer a documented place to look during a device evaluation. A useful evaluation record would name the browser, selected GPU, render resolution and camera settings. The same settings can then accompany a source change, helping a reader connect the timing to the scene being rendered and the hardware doing the work.
web-ocean vs Web Ocean 3D and WebGPU Ocean
Noniv/web-ocean documents direct WebGPU rendering, while the two alternatives describe implementations built around Three.js. The decision below follows those architecture and feature descriptions. Choose according to the code and scene behavior you want to start with: an ocean pipeline without an engine, an island scene with water interactions, or an ocean with named weather presets.
| Project | Documented approach | Choose it when |
|---|---|---|
| Noniv/web-ocean | WebGPU without an engine or rendering library; self-contained HTML bundles | You want to inspect or adapt the rendering pipeline directly |
| Web Ocean 3D | Three.js, WebGPU and TSL; shore break, buoyancy, wakes and underwater transitions | Shoreline or underwater interactions are central to your brief |
| WebGPU Ocean | Three.js and WebGPU; Calm, Breeze and Storm presets | You want a Three.js implementation with selectable weather |
Web Ocean 3D's supplied README extract lists shore break, foam, caustics, buoyancy, wakes, underwater transitions and a volumetric sky. These advertised features make it a relevant candidate for a broader interactive scene. They also explain why a developer should compare starting implementations before adding major scene behavior to Noniv's open-ocean renderer: the required interactions can shape the architecture from the beginning.
WebGPU Ocean's supplied README extract describes Three.js and WebGPU and offers Calm, Breeze or Storm weather. A developer already working with Three.js can inspect that project alongside Noniv's direct approach and decide which architecture better matches the application they intend to maintain. Weather selection gives the comparison another concrete feature to examine when choosing the initial scene and controls.
How the source is organized
The README places device setup, resources, the camera and the per-frame loop in js/main.js, with rendering work split across shader modules. This is a useful starting map for a graphics developer reading the repository. Begin with the frame loop to understand how the pieces connect, then follow the simulation or shading module that matches the change you want to make.
The documented js/wgsl/ layout separates sim.js for waves and foam, sky.js for atmosphere and clouds, ocean.js for the surface and sky pass, and post.js for bloom and tone mapping. common.js holds shared structures. The README identifies index.html as the page shell, HUD and settings styles, server.mjs as the development server, and build.mjs as the builder for both HTML bundles.
The README describes six wave cascades of 256 by 256 samples and a surface mesh with 17 levels. It also describes two cloud layers and an HDR scene with 4x MSAA followed by an 8-level bloom and AgX tone mapping. Together, these details give the reader concrete implementation topics to follow through the module map, rather than treating the repository as a single opaque HTML demonstration.
FAQ
The README keeps the camera above displaced water, which answers the diving question raised in issue #3. The supplied questions also concern Firefox and the original generation prompt, followed by commercial use, maintenance and implementation language. The answers below point directly to the relevant camera instruction, issue, license or repository fact so a first-time reader can find the corresponding source.
Can I dive underwater in web-ocean?
No: the README says the camera keeps itself above the displaced water surface so waves never pass through it. The reporter of issue #3 tried to dive and encountered that boundary. For an underwater scene, compare Web Ocean 3D's documented underwater transitions before choosing a foundation; its feature list addresses the interaction requested in the issue.
Why does web-ocean not work on Firefox?
Issue #2 records a Firefox failure and a comment acknowledging that it needs a fix. The README's running instruction specifies recent Chrome with WebGPU and a reasonably capable GPU. Start with that documented browser route, and use the linked issue when reviewing the browser requirements for an application built around this renderer.
Can the author share the prompt used to generate web-ocean?
Issue #4 requests a PROMPT.md file containing the prompt used to generate the project. The README describes asking Claude Code for realistic water with a floating camera, then giving feedback on clouds. Read that account for the author's development process and the issue for the specific artifact the reader requested.
Can I use web-ocean commercially?
Yes, subject to the MIT license conditions: the license file permits use, modification, distribution and sale. It requires the copyright and permission notice in copies or substantial portions of the software and supplies the software without warranty. Keep those notices when distributing an adapted bundle, and read the license when deciding how to package the renderer with an application.
Is web-ocean still maintained?
The supplied GitHub metadata records the last push as 2026-10-17, and the sampled Firefox, diving and prompt issues are open. The repository facts provide the dated activity observation. Those records give a developer specific activity and outstanding requests to inspect when deciding whether to adopt the code or maintain an adaptation.
What is web-ocean written in?
GitHub classifies the repository as HTML, while the README describes JavaScript modules containing WGSL shaders. Its layout puts device setup and the camera in js/main.js, with separate shader modules for simulation, sky, ocean and post-processing. The delivered HTML page is the viewing entry point, while the modules expose the rendering work a graphics developer would study or adapt.
What we have not tested yet
Our measurements cover source installation and compilation at commit a07c7fd; browser rendering, visual quality and GPU performance are outside those results. The Compose safety failure supplied no browser workload, and the pack contains no screenshot records or known-answer workload. We have not tested Chrome rendering, reproduced the Firefox report, exercised mobile input, measured integrated-GPU performance, inspected device-loss recovery or run a long browser session. The author's GPU timing is a separate observation rather than our independent hardware benchmark.
The Firefox thread supplies no cause or recorded fix, and the diving and prompt requests supply no implementation, workaround or requested prompt file. The README defines further scene boundaries: no shoreline, surf or objects in the water; two flat cloud layers; and distant water somewhat darker than the bright horizon. It describes water tuned toward turbid coastal conditions, with a slider for darker, bluer deep water. Visual assessment and integration into another application remain outside this review's measured work.
The sandbox's 8 GB allocation is configuration, not renderer memory consumption, and lab-node:22 is an image label rather than proof of actual runtime or operating-system versions. The zero-vulnerability npm audit is a dependency-check result, not a security review. The supplied material establishes no completed external production integration, maintenance schedule or measured comparative winner. Rendered site layout, assets, accessibility, automatic related links, recommendation modules and template content also remain outside this text review. The useful next step is to open the documented bundle on named target devices and record a frame, browser behavior and GPU timing.