Short answer: use it for a narrated archive story
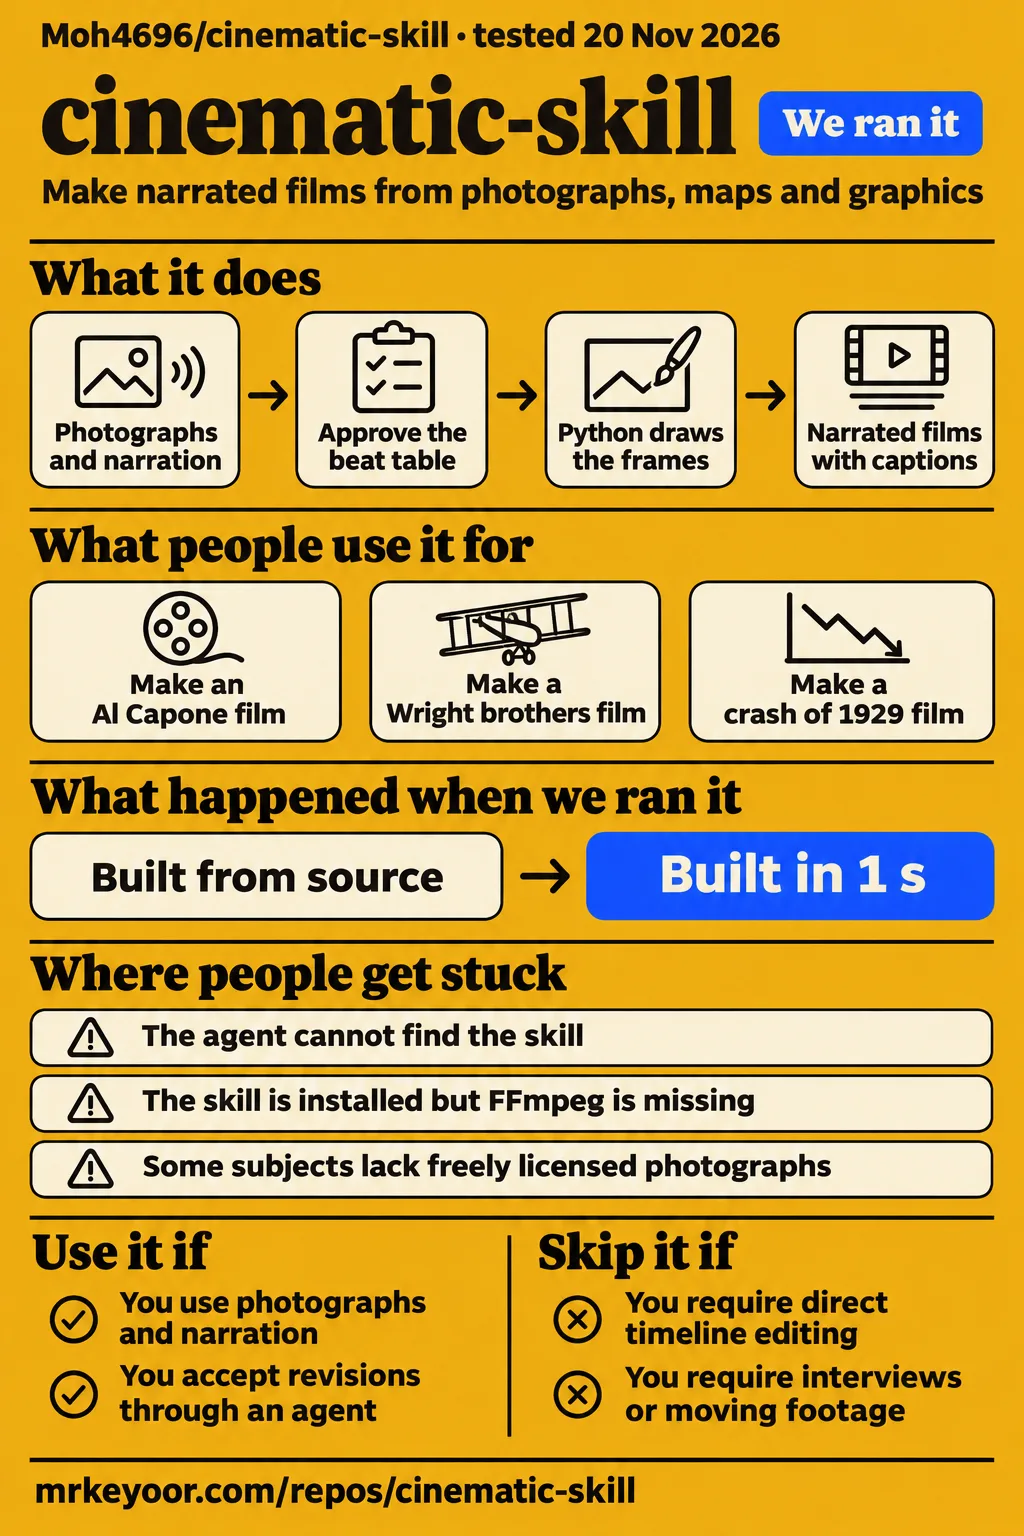
Moh4696/cinematic-skill documents narrated films made from photographs, maps and code-drawn graphics, with no AI video model drawing the frames. The project README describes the Python renderer and narration timing. Use it when those materials can carry your story and you are comfortable asking a coding agent to revise scene code. Skip it when interviews, moving footage or direct timeline editing are essential: those are the format boundaries identified in Fervor Creative AI's workflow analysis.
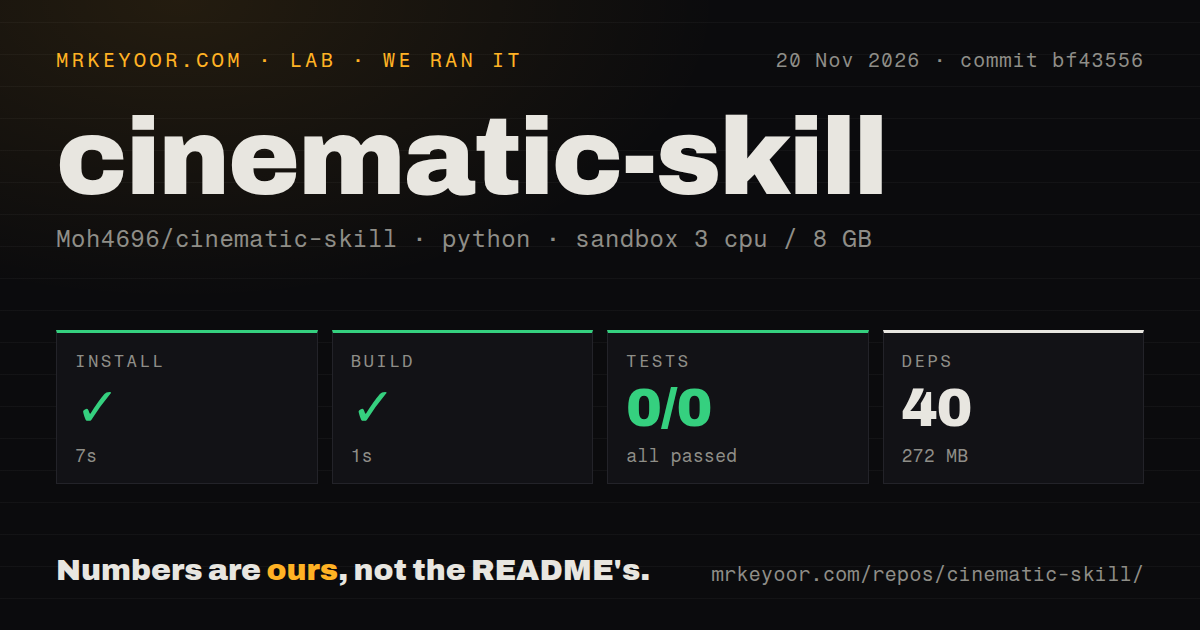
Our November 20 run completed installation in 7 seconds and build in 1 second, then pytest exited 5 with no tests collected. The production method is the central choice here: narration determines visual timing, photographs sit within a designed board, and an agent changes the scene. The README's worked example gives that choice a specific subject and sequence to examine, with a script, photographs and camera moves organized around the Wright brothers' first flight.
Photographs and narration define the format
The README describes one continuous camera move across a designed world of photographs, documents, maps and cards. Stamps, highlights and counters follow words in the narration, while Skia draws the frames in Python. The README's workflow description also includes sound effects, an optional score and burned-in captions. An event in the spoken explanation has a corresponding event on the board, so the narration supplies the timing for the visual sequence.
Moh4696/cinematic-skill is a different project from Cinematic UI. The Cinematic UI getting-started page describes a skill for directing websites, and its FAQ identifies akseolabs-seo/cinematic-ui as the repository. Browser screening, website layouts and that project's Node scripts belong to Cinematic UI. This review concerns the Python film workflow owned by Moh4696; its installation instructions and production steps come from that repository's README and installer.
What people use cinematic-skill for
The reported examples include an Al Capone documentary, the Wright brothers worked example and a tutorial presenter's film about the crash of 1929. Each account identifies a film rather than a general category of possible work. The first two come from the project author; the third comes from the presenter. These examples make short history stories the clearest starting point for understanding the narration-and-archive format.
| Who made it | What they made | What the account shows |
|---|---|---|
| exploraX, the project author | A five-minute Al Capone documentary | The author says the skill grew from what broke while making that film with an agent. README origin account. |
| The project author | Twelve Seconds, about the Wright brothers | The README describes a roughly 90-second worked example made from seven public-domain photographs. Worked-example description. |
| The presenter of YouTube video L9vmu0lfJA8 | A documentary about the crash of 1929 | The presenter says another sentence led to this film. Tutorial account. |
The README also documents product launches using your own photographs, science explanations using diagrams, and technology stories using screenshots or stills. Those are proposed applications in the README's format table, while Al Capone and Twelve Seconds have named example accounts. For choosing a first subject, the worked example offers an existing structure to inspect; a product story starts with your own images and editorial choices.
What happened when we ran it
Our November 20, 2026 sandbox run at commit bf43556 completed installation in 7 seconds and build in 1 second. The recorded setup measurements also show 40 dependencies and 272 MB on disk. The test command failed with exit 5 after 2 seconds, recording 0 passed, 0 failed of 0. Its final output was no tests ran in 0.01s, so the recorded failure is an empty pytest collection.
| Recorded step or observation | Result |
|---|---|
| Installation | Succeeded in 7 seconds; 40 dependencies recorded; 272 MB on disk |
| Build | Succeeded in 1 second |
| Tests | Failed, exit 5, in 2 seconds; pytest reported 0 passed, 0 failed of 0 |
| Test-log tail | no tests ran in 0.01s |
| Checkout | 50 files, approximately 4,116 source lines, 2.2 MB |
| Repository signals | One CI workflow file, a tests directory and no Dockerfile |
The configured sandbox had 3 CPUs, 8 GB of RAM and image label ghcr.io/astral-sh/uv:python3.12-bookworm. Those are recorded configuration values. The checkout contained a tests directory and one CI workflow file, but the command still collected zero tests. The log reports the empty collection without naming a package, platform or configuration cause for it.
The November 21 film attempt stopped at the harness safety step, which reported unsafe repo: none of compose.yaml, compose.yml, docker-compose.yaml, docker-compose.yml exists (rule: a compose file is required). The run summary nevertheless described deployment with its own Docker Compose and every port bound to 127.0.0.1. Those records conflict; the failed safety step makes this a stopped attempt. The teardown record reports ok.
Where people get stuck: discovery, voices and revisions
The shell installer installs skill links or copies; Python packages and FFmpeg belong to the separate runtime setup. The installer explicitly requires bash and git, while the README lists the scripts' requirements. There are two installation tasks: making the skill discoverable to an agent and installing the programs used to produce a film. The shell script handles the skill destinations; the README then gives the Python dependency command and FFmpeg requirement.
| Where you get stuck | What to do | Basis and status |
|---|---|---|
| The agent cannot find the newly added skill | Start a new agent session | Explicit README setup instruction. |
| An existing skill occupies the destination | Inspect the existing folder before moving it aside | The installer skips destinations it does not own. |
| The skill is installed but runtime programs are missing | Install the Python requirements and put FFmpeg on PATH | The README separates runtime setup from skill installation. |
| You need a scratch voice | Use the README's macOS say or espeak-ng route | The documented voice workflow names both. |
| A narration line has a suspect split | Listen to the flagged line | The secondary workflow analysis describes the listening step. |
| A visual needs different timing or placement | Request the change through the agent and scene code | Fervor describes revisions through code. |
The installer supports named agent destinations, a custom --dir, copies through --copy, and removal of links or marked copies it created. Its occupied-destination message leaves something else installed there instead of replacing it. These are concrete installation choices in the shell script, useful when deciding whether the skill should live in an agent's usual folder or another skills directory.
The workflow asks you to approve the story before the finish
The documented workflow stops for approval after the beat table, the look and a 30-second draft. The README names all three checkpoints, making the process more specific than a one-sentence film request. The beat table pairs each narration line with what the camera will show. That is where the proposed visual evidence and written explanation first meet in a form the creator can review together.
The README puts a scratch voice before the finished scene, then allows final narration from a text-to-speech service or a person. It describes recording one section at a time, splitting the recording into timed lines and flagging suspect cuts. Scene review uses stills and contact strips before the draft. The documented sequence gives you several review objects: a script-and-image plan, a visual treatment, individual camera moves and a short narrated sequence.
The installer runs locally and image credits need checking
The README's shell installation command downloads a script and passes it to bash. The installer's readable contents show that it clones or updates the repository, selects skill destinations and creates links or copies. It also supports named agents and a custom directory. Reading those actions gives a concrete account of what the installation command changes before choosing where the skill should live.
The README says the Commons tool records licences, refuses non-free files and writes credits.md. Fervor recommends following an image's stated source to the library or museum record, and also notes that some twentieth-century subjects lack freely licensed photographs. Asset availability therefore belongs in subject selection. The README permits your own photographs and AI stills, while Fervor distinguishes illustration from evidence of a real person or event.
Repository attention and the open integration question
GitHub metadata observed on November 21, 2026 records 875 stars for Moh4696/cinematic-skill and a last push on November 9, 2026. The repository metadata supplies those dated observations. The star count describes attention to the repository; the installation and pytest results above describe what happened in our sandbox. They answer different questions about the project and should be read separately.
The issue evidence centers on issue #1, asking whether cinematic-skill works with jcode. Its recorded status is open with zero comments. That is a specific integration question. The README names several other installation targets, including Claude Code, Codex, Cursor, Gemini CLI and OpenCode; the jcode question concerns a different integration from that documented list. The issue title provides the question, while the README provides the named installation routes.
cinematic-skill vs alternatives
AustinZ21/cinematic-skills describes camera language, shot planning and a still-to-film pipeline. Its project description identifies shot direction as an immediate task. Visual Skills describes writing prompts for image and video models in its project description. Fervor adds a conventional-editor comparison: the narration-first production order can also be used in Premiere, Resolve or After Effects, while cinematic-skill routes scene revisions through an agent and code.
| Workflow | Why choose it | Basis for the decision |
|---|---|---|
| Moh4696/cinematic-skill | You want narration-timed photographs, maps and graphics | The README describes a code-rendered documentary board. |
| AustinZ21/cinematic-skills | Your immediate task is shot planning or a still-to-film sequence | Its project description names those tasks. |
| smixs/visual-skills | You want prompts for an image or video generator | Its project description says it returns copy-paste-ready prompts. |
| Premiere, Resolve or After Effects | You prefer a conventional editor for a narration-first production | Fervor says the production order transfers to these editors. |
| AI video generation | Your planned output calls for generated moving images | Fervor contrasts that approach with an archive-photo documentary. |
Fervor describes cinematic-skill revisions as requests through the agent, rather than grabbing and nudging a clip on a timeline. That description of scene revision gives the choice a practical consequence: timing and placement changes become changes to scene code. A prompt-writing skill, a shot-planning skill and a narrated-board renderer produce different things, even when all three use the language of filmmaking.
Outdated claims, corrected
The tutorial's paid-Claude requirement describes its chosen setup; the README documents installation for several agents. The tutorial's requirement wording names a paid Claude subscription, while the README names Claude Code, Codex, Cursor, Gemini CLI and OpenCode. Claude is one documented route rather than a universal requirement. This correction concerns which agent the project documents, not the price of using every possible agent or narration service.
The README's npx route requires Node 22.20+, while its shell installer requires bash and git. The README explains the Node route, and the shell installer states its own requirements. Python packages and FFmpeg follow as separate runtime setup. Likewise, a one-sentence request starts a process with three documented approval stops; it still includes the beat-table, visual-treatment and draft decisions described by the project.
FAQ
The README reports about six minutes to render its 92-second example at 1080p on a 16 GB laptop. That answers the rendering-time question with a named workload and machine-memory figure. The questions below also cover the jcode integration request and the tutorial's claims about creator skills and hardware, separating the README's runtime requirements from the presenter's description of an agent-assisted experience.
How long does rendering a documentary take?
The README's figure is about six minutes for a 92-second film at 1080p on a 16 GB laptop. Fervor repeats that README attribution and separately reports about three hours for a five-minute film at 4K on a 16 GB laptop, with a recommendation to use 2560 by 1440 for YouTube. These statements describe different output sizes and film lengths; the seven-second figure in our run measures installation.
Will cinematic-skill work with jcode?
Issue #1 asks whether cinematic-skill works with jcode and is recorded open with zero comments. The jcode issue is the direct source for that question. The README's installation list names Claude Code, Codex, Cursor, Gemini CLI and OpenCode. For someone choosing an agent, those are the documented targets to distinguish from the integration requested in the issue.
Do I need editing skills, Python knowledge or an expensive graphics card?
Python packages and FFmpeg are required by the README, while the tutorial presenter says editing skills, Python knowledge and an expensive graphics card are unnecessary. The presenter's statement describes the agent-assisted experience. The README's setup instructions still name the runtime programs, and its approval checkpoints give the creator responsibility for reviewing the beat table, look and draft while an agent handles the commands.
What do viewers think of the author's Al Capone film?
The author's X post asks for opinions about the Al Capone film rather than reporting a viewer verdict. The exploraX post presents the film as made from a prompt and reference images and asks, "What do you guys think of the film?" The README connects that named production to the origin of the skill's rules and code, making it an author example and invitation for feedback.
What we have not tested yet
The completed run covers source installation, build and empty pytest collection; the later film attempt stopped at a Compose requirement. A full render, agent approval stops, narration alignment, suspect-cut detection, Commons refusal behavior and generated credits remain outside our completed observations. The deployment summary supplies no completed-film result. Actual runtime and operating-system versions require the raw toolchain logs; the sandbox image label alone does not establish them.
Windows behavior and jcode integration need separate evidence, as does execution across the README's broader agent list. The author and secondary article supply the render timings, not a controlled comparison from our machine. Render memory, output quality, long-film behavior and time saved against conventional editors or AI video generation are unmeasured here. The descriptions of alternative projects compare their documented purposes rather than results from running them side by side.
Security auditing, worldwide image rights, historical accuracy across subjects, support responsiveness, production adoption and audience response are also outside these observations. The X extract contains no viewer-response sample, and the jcode thread supplies no compatibility answer. Rendered page layout, resolved links, related-link modules and template behavior were not exercised in this text revision. For a first project, the README offers the Wright brothers worked example before a creator moves to their own photographs and narration.